For the second week of ds106zone, the Summer 2013 edition of ds106, we were working in part on design assignments. I had a few ideas of things I wanted to do, but only managed to get one thing done because it took me so long. I decided to take on a difficult assignment, knowingly, because I wanted to force myself to learn about more things in GIMP to do it. That definitely worked–the learning about stuff part. The final product is not quite what I wanted, but it’s pretty close, which I’m happy about.
I thought about doing the “Wait, where’d that guy come from?” assignment, which I thought I could do fairly easily in GIMP, or the “Lyric typography poster,” which would give me a chance to play around with fonts, but decided that what would be most challenging, and therefore would push me most to learn lots of things, is the “I can read movies” book cover assignment. That requires looking at & choosing fonts, as well as adding things into images, and more, so it is a bunch of things I wanted to learn rolled into one. It is also quite difficult to pull off well.
I looked at Spacesick’s original “I can read movies” covers, and most of the ds106 versions on the assignment page, and decided I wanted to go with a black background with a couple of colours. It reminded me of a kind of 60s/early 70s aesthetic that I thought would work for my idea to do a Twilight Zone episode version.
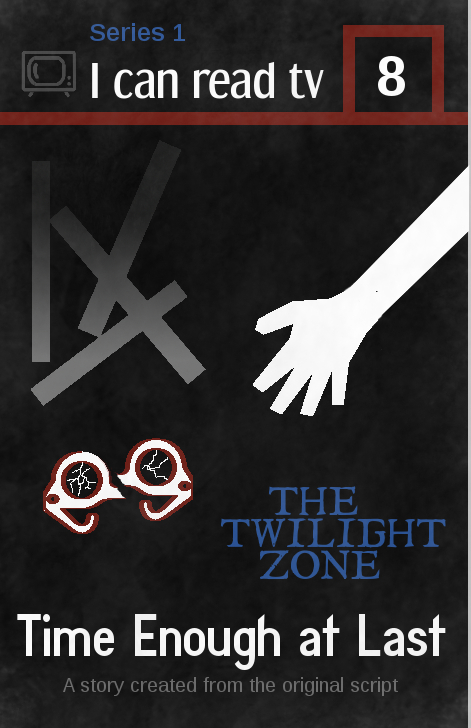
Here’s the finished product.
 What I was trying to do:
- I wanted to capture an idea, a feeling, or a scene in 2-3 images, and when I first thought of this assignment what came to mind was the scene where Bemis’ glasses have just fallen off and broken, and he is reaching down to them. He doesn’t yet know they’re broken, and his vision is completely blurred, just like it will be for the rest of this life. It’s the moment just before he finds out, and I find that powerful. I originally created the rectangles to represent rubble–I was thinking of those skeletal remains of buildings you sometimes see in rubble, with just some beams left over. But later, I thought they could also be book spines, perhaps–a jumble of them.
- I included “Series 1” and the number “8” to fit the season/episode.
- I wanted to include a tv icon on the top left, instead of the movie icon that Spacesick used for the book covers.
- I wanted to make it look old and worn, and somewhat “paper-y,” as it’s supposed to be a paperback, and one that was printed decades ago.
What I’m happy with
- The design of the three images–hand, glasses, rubble–turned out almost exactly as I meant it to. It’s what I pictured. Except for some details, as noted below.
- I like the fonts I found for the “I can read tv” (Dream Orphanage) and the “Time Enough at Last” (Diamante Fresko). I wanted them to look like they’d fit a book from the 60s. I’m not 100% happy with them, but I think they work all right. I tried to find one that fit The Twilight Zone original font, and the closest thing I found was I Still Know. It’s pretty good, but “The Twilight Zone” on the book doesn’t quite look how I wanted (see below).
- I think I managed to make the book look dusty and a bit worn, which I’m happy with. I wanted to do some other things to make it look more worn, though, as noted below.
What I’m not happy with
There are a number of things I’d like to change, but I just needed to finish this so I could move on to week 3!
- The thing I worked hardest at was dealing with the pixelation of the glasses and hand. As you can see, I didn’t end up managing to fix it. The rubble ended up pixelating too, which was weird b/c I drew that myself. Saga on all that below.
- I’m not happy with the colour of the tv icon at the top left. I struggled with what colour to make it, as I wanted this to have only a couple of colours beyond black/white/grey (given the b/w of the original show). I didn’t want anything really bright, as again, I wanted to stick fairly close to a b/w feeling (that’s why the colours that are there are pretty dark). The problem was I had to colour this thing by hand, as discussed below.
- I think the font for the “Series 1” at the top, and the “A story created from the original script” at the bottom (both are Liberation Sans) doesn’t really fit the rest. It’s too modern-looking.
- I’d like to have more spacing between the lines of “The Twilight Zone,” so the three words are separated a bit more. But when I hit “return” after each word in the “text” tool, the spacing was too large. Beyond putting each word on a separate layer and moving them, I don’t know how to fix this. I decided not to put each on a separate layer and move, but just leave as is.
- I didn’t manage to make the book look as old and worn as I wanted, nor to look like it was made of paper. I like the look of the one on the assignment page for this assignment, with the light pixels on the edges that makes it look like the top part of the paper is flaking off a bit. See below for how I tried to do this, without a lot of success.
The process
Since this was a complicated process, the discussion will be a bit long. As with my post on selective colourization, mostly I’m documenting this in such detail for my own future reference, and for anyone else who is very new to GIMP like me.
Creating the hand and glasses
I got the hand and glasses from The Noun Project site. They were svg (scalable vector graphics) files, as are all the files on that site. I had watched the presentation on design for ds106zone and learned that svg files are useful because they don’t pixelate when scaled. So I thought: hey, great! I’ll put them in my image and scale them up a bit and they’ll look fine.
No. I didn’t watch the presentation carefully enough. Tim Owens and Jim Groom noted that when you import svg files into GIMP they get turned into something else (jpegs, I think), and so when you try to scale them up they DO pixelate. Tim suggested we could import them into GIMP as bigger images (you can choose the pixel size when you open them in GIMP) and scale down, and they’d look okay. Which I did, and they did.
But the problem came when I tried to colour the svg files from The Noun Project. They were black to begin with, and I needed them white. It was when I coloured them that they pixelated. I used the “fuzzy select” tool and then the bucket tool to colour them white, and I got weird pixels. I don’t know any way to fix this except to use an svg editor like Inkscape (thanks to Brian Bennett for suggesting that to me via Twitter). But I just didn’t want to try to figure out a new image editor at this point. So I lived with the pixels.
I drew an arm to attach to the hand with the lasso tool and filled it with with with the bucket tool. I then wanted some kind of colour on the glasses, so I tried colouring them entirely red, but I didn’t like the look. So I used “stroke selection” to do an outline on them, Which was also pixelated b/c they were pixelated. I used the pencil tool, I think, to draw in some “cracks” on the glasses lenses.
To break the glasses in half, I selected one half of them and used “cut” and then “paste” to get a floating layer. Then I created a new layer and anchored the floating layer to it (if I remember correctly). Then I could move that half of the glasses separately from the other half. I know Henry Bemis’ glasses didn’t break in half in the episode, but I did this to emphasize their brokenness.
Creating the rubble
I drew rectangles with the rectangle select tool, and filled them in with grey. But they were all vertical, and I wanted them rotated a bit. This turned out to be difficult, because when I used the rotate tool I got white where the bars used to be. I didn’t know what to do, so I started trying to paint black over that white part, which was a pain. I can’t remember exactly where the bars were–I think on the background layer, rather than on their own separate layer. I did an extensive web search to solve the problem, and finally found an answer here. I discovered I could put the rectangles on a floating layer and then move them, either using a combination of key strokes or “cut” then “paste” to create a floating selection. I can’t recall if I could rotate them on the floating selection or whether I had to anchor them to a new layer first.
I originally made the rubble just grey (to fit the b/w show, and grey seems a good colour for rubble), but it looked really flat. So I used the “gradient” tool in GIMP to add a darker/lighter gradient–picking the foreground and background colours and making the gradient go from one to the other.
Creating the top of the image
I just used the rectangle select and bucket fill tools to do the red lines at the top. The tv icon was also from The Noun Project, and was also black to begin with. When I used the fuzzy select tool to try to recolour it, the pixelation was really, really bad. It looked awful. So, I used the lasso tool and selected around each part of it and then used the bucket fill to change the colour. I tested a few colours and decided on grey. It took awhile to hand select and colour in the whole icon, so when I was done and didn’t like the colour I couldn’t bring myself to do it again.
Adding the dust
At first I tried the following. I first downloaded some new brushes, from the Deviant Art site. I downloaded some texture brushes and some “grunge” brushes. Then I created a new layer and coloured it white, lowering the opacity. Then I used the eraser tool and played around with some of the texture and grunge brushes to erase away parts of the white layer. This looked pretty good, except that there was then no “dust” on the white parts of the image. I realized I needed to add grey “dust” to make the white parts look a little old and worn as well.
So I used some of the texture and grunge brushes and painted on a grey colour. I played around with the colours and the opacity, as well as the brush characteristics, including size, spacing, dynamics, and more. Here is a nice tutorial on brushes that I found very helpful.
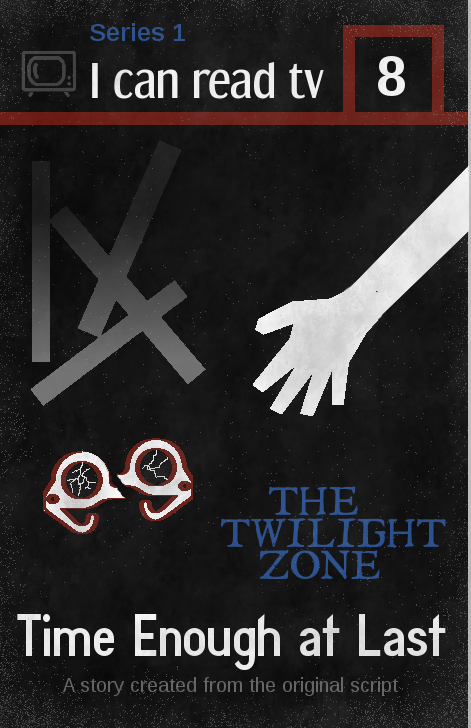 As noted above, I wanted to try to make the book cover look like parts of the paper were flaking off because it was old. I tried to do this with the “dissolve” mode on various brushes, playing with the colour and opacity, and the best I could do is at left and below. I used white at first, but it just looked weird, so I went with grey. It’s okay, but it looks like grey speckles rather than flaking paper.
I tried a few different ways of doing the speckles, with different colours and opacities, and here’s one with brighter speckles. I still don’t think it looks like paper flaking off. Not sure what else I could have done.

Well, I think that’s it for process. I’m pretty happy with the way it turned out, but it took me a LONG time because I still don’t know that much about GIMP. But doing this project taught me a whole lot of things I didn’t know before, so I’m very happy about that!
Hi Christina,
There is a lot in this post. In a way, you remind me of myself, trying to find your way around things. I found that one of the most important things was to import suitable files and publish regularly, not wait for the end of the process. A bit like cooking: choose your raw ingredients carefully and taste regularly, kind of thing.
Perhaps you could isolate one of two things you struggled on, practise on them in a new project or just an exercise, using video (or other) tutorials.
It’s so good you are pursuing with GIMP. I gave up quickly and admire the determination, :)
Hi Pascale:
I want to understand precisely what you mean by importing suitable files and publishing regularly instead of at the end of the process. Do you mean doing smaller tasks and blogging about them rather than doing a big project like this and blogging about all the different steps? It makes sense to do smaller, simpler tasks and practice them, yes. I took on more than I could chew this time! And this particular instance of ds106 is so, so quick as a summer course I think I felt some pressure to learn a lot in a short time, through a challenging assignment.
Good point about picking one or two things I need to work on, things I want to practice, and doing some new projects or exercises. That’s probably what I should have done to begin with. But here we are, with a big project and a long post describing it! Next week we move on to audio, so I’ll be working on an entirely different thing. But I plan to go back to image editing for certain. I really, really enjoy it.
Oops, Sorry if this was vague.
What I meant by importing was files you bring into your project. I am no expert, but I think it makes sense to choose files of size and quality that match the output, not have to modify them too much. So if you need a Tv pic that 100×40, choose a TV pic that is close to that, but not smaller. But, someone else reading this may think differently.
By publishing, I meant save and look at it in 100% and in the file format you’ll eventually have it in. Just because you want to check that you are going in the right direction.
Oh, maybe I should not comment though! Someone with a real technical background may be giving you better advice. Most of my knowledge is picked up here and there, you know :(
Ah, I get it. Yes, finding the right size and colour icons to begin would have been much easier! I tried, but could find nothing I liked. I must say I don’t really know where to look, so that was a big part of the problem. And very good point about publishing in the final format and size to see what it looks like, as you go along. Definitely will do that in future.
But of course you should comment–different people have different processes, and I need to try various ones to see what works best for me!
Wow, what an amazingly thorough write-up and reflection, and the fact you are picking one assignment to really push yourself to learn the elements of an application and design more generally is a brilliant way to approach the ds106zone. Not to mention this write up is worth the full 15 stars alone :) I also have to admit you picked one of my all time favorite design assignments, I Can Read Movies is such a good assignment because it is both challenging and inspiring because you have the freedom to pick something you want to do–which always makes the difference in my opinion. I should probably teach some of the details of Inkscape, but to be honest I haven’t played with enough to be at all helpful. That said, one of the things you have demonstrated so beautifully over the last two weeks is that inspiration and the willingness to challenge yourself is the only true source of learning. Kudos!
Hi Jim:
Yeah, this write up might have been TOO epic…too long for most people to slog through. Really, I had to do it because I forget things so easily and if I didn’t write down all the steps I’d wonder later just how to do x, or y, or z, or whatever. For me, the whole process AND writeup felt like 15 stars. I literally spent all week on this, a couple hours each night. Whew! And though it didn’t turn out quite the way I wanted, I’m taking a cue from something Alan Levine said to me on Twitter before this course started. When I said I was intimidated by ds106 b/c there were so many people doing such great stuff, he said, don’t compare yourself to others, only to yourself. In that regard, I’ve come a long way, baby. Thanks for the support in my struggles–nice to know my general approach is a good one!
Oh, and I think I’m finally getting how ds106 is #4life. At least for me, this means that you just keep on learning, keep on practicing, keep on doing stuff and getting better, over and over. And you’ve got a community of people to help you, to bounce ideas off of, to give and get advice; that’s what I’m starting to develop through the course, which is fantastic. I am learning so, so much from seeing what other people are doing. Plus, to me it means that the next time the course is held synchronously, I can participate in big or small ways, however I have time, and force myself to practice more with some of the same people plus a new group. Love that.