Tag Archives: interactivity

Poll Everywhere: engage your class in real time

whatisit.png

Poll Everywhere is a web-based and mobile app that you can use to engage your audience and to support classroom assessment. You can use your mobile device or log in with a web-based version to start a question and your audience can respond to your question with their own device by scanning your QR code, texting or finding you via the shared URL. Once students respond, you can see their real-time responses and present the results in your PowerPoint, Google slides, keynote, or on your website.

Depending on your needs, you can choose from a free educator plan or various paid plans. The K-12 Basic plan is Free (teacher account/sign-up needed; no student account or login required) and you get:

  • Responses per poll: 40 (explain)
  • Allows to present via Powerpoint, Full-screen web presentations, Many question types, Live word clouds, Text walls, Customize look & styles
  • Support: FAQ online

Why-is-it-relevant-360x82.png

Using Poll Everywhere in your classroom, you will be able to collect students’ answers and feedback in the moment. It can also be used as a great tool to engage your students and probe their understanding in a certain concept as an activity strategy or closure. This formative feedback can support teachers in planning and scaffolding instruction.


how-to-get-started-360x80.png

To get started with Poll Everywhere, there are a few steps:

1. Teacher signs up/Login to Poll Everywhere

2. Create your questions on your laptop/desktop in the browser.

Using Poll Everywhere, you can choose from a large variety of poll activities, including multiple choice, open response, live word clouds, clickable images, up- and down-voting for Q&A, and rank order. Plus, you can write your questions in different languages as well!

3. Invite your students to respond.

They can go to a customizable web address on their mobile devices or computers (by scanning your QR code or inputting the address into their browsers ) or send a text message to participate. As a teacher, you’re encouraged to use a premium moderation feature, that will allow you to filter the response before they are presented on the shared screen.

3. Collect the results and share with your students.

You can simply use a live chart to present the results, and also change the color, font or images as you want. To display it, you can use a web browser or embed your results in your Powerpoint or Google Slides as well.


videopng-360x61.png

3 Comments

Filed under Not Subject Specific, Resources

Anatomy 4D : using AR to teach human body structure

PLEASE NOTE: Anatomy 4D is no longer available, but you may still be able to use the app if you downloaded it prior to May 2018. You can explore the other AR/VR technologies in our collection of resources to see newer alternatives to Anatomy 4D.

whatisit.png

Anatomy 4D is an iOS and Android-based, Augmented Reality app to help your students explore the human body and human heart structure with the cutting edge technology. It can help you simplify the complex concepts and help your students better understand the content!

Why-is-it-relevant-360x82.png

Based on instructors’ testimonials, Anatomy 4D has developed an interactive and amazing tool to engage students with important biology concepts allowing them to learn and explore the human anatomy. In fact, the 4D images and resources available on Anatomy 4D allow users to delve into the body through augmented reality and is currently used by students, teachers and medical professionals.

“Anatomy 4D is a fantastic app. It helps to understand human body structure to great extent to a layman like me.”( Purushottam Kunte)


how-to-get-started-360x80.png

  1. Download and print out the the posters (card stock paper is recommended).
  2. Note: posters must be colored.
  3. Download the Anatomy 4D app from iTunes or Google Play.
  4. Open the app and use your camera to scan the colored poster; use the filters to change what has been presented in front of you!

videopng-360x61.png

Have a quick look at how Anatomy 4D works:
Heart Target:

Body Target:

2 Comments

Filed under AR & VR, Resources

iPad possibilities – preparing for practicum!

UBCSandbox

Technology use for technology’s sake is not what we are striving for in education today. Transforming learning by providing opportunities that would not otherwise be afforded is a goal that, with emerging technologies and increased access, may be achievable. This transformation can be as simple as allowing for as-needed differentiation, as is the case when providing a student with the option to audio record, video record or ‘screen capture’ record his/her ideas or can include such opportunities as sharing their ideas and creations with a larger audience online.

Explore some ways to connect with students and provide for interactivity – my top 5 apps for student engagement and expression (including some that are cross platform!). Download the Handout for more information (links to research and practice)

Sandbox_iPad Possibilities_Oct 2015

Always explore with a critical eye and ask yourself key questions such as:
• Is it intuitive?
• Is it interactive? Does it support content creation and collaboration?
• Can you edit once you’ve started?
• Can work be easily exported?


‘Whiteboard style’ applications are terrific for formative assessment, project work and digital storytelling (among other things). I like to offer students the opportunity to share their learning using ‘Explain Everything’ or ‘Showme’. Providing multimodal opportunities for expression and representation of learning supports Universal Design for Learning – remember to consider offering choice!

These apps allow students to create content on the iPad (rather than just ‘consuming’). Students are able to draw, text, upload images and narrate. This can provide the perfect platform for teachers to have the opportunity to recognize understandings and to catch misunderstandings. Using devices to support students creating (or co-creating) stories, presentations & projects moves the learning up the SAMR ladder!


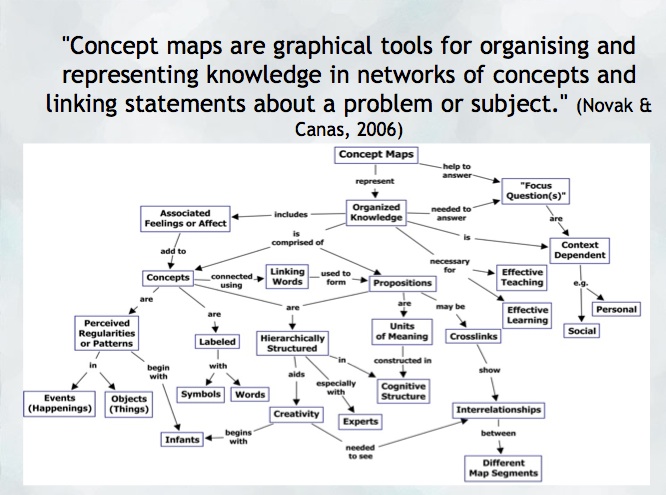
Another opportunity to help a student construct and share their understanding might be a concept map. Mind mapping, or concept mapping, can be a powerful tool where students are encouraged to illustrate the connections between their ideas, concepts or content in meaningful ways.

“A concept map is a type of graphic organizer used to help students organize and represent knowledge of a subject. Concept maps begin with a main idea (or concept) and then branch out to show how that main idea can be broken down into specific topics”.  There are some excellent tutorials on this site and information for teachers about the ‘concept’ of ‘concept mapping’

mindmap
Try: Inspiration or Kidspiration  as iPad apps

*Many schools also have licensing for this application on their computers or laptops.

Digital Storytelling is another excellent use of the iPad for content creation… try Puppet pals, Showme or imovie (among others!)


Sketchnoting and Digital Storytelling offer many opportunities mobile content creation… try Puppet pals, Showme or imovie (among others!)

Feeling ambitious?? Consider this ‘App Smash’ sequence:

  • Storyboard your ideas using Kidspiration (or, better yet, markers and paper!).
  • Create a talking avatar (or narrator) using either Chatterpix (making an avatar with an image of your own) or Telegami (talking, moving avatars) and save the video to your camera roll. *Save a screen shot of the character if you want to embed it into your story at some point!
  • Draw a background using ‘Paper53’ and save it to your camera roll.
  • Now, create a story using either ‘PuppetPals’ or ‘Explain Everything’ (import your background and character into this app)
  • Finally, you can merge it all together using ‘iMovie’! You now have a personally constructed digital story!

Leave a Comment

Filed under Not Subject Specific, Resources

ThingLink: Annotate Images and Videos

Thinglink is a web-based and iOS / Android application that allows you to embed  audio, video and other rich media links directly into images and share them across the web. Using Thinglink, you can engage your students with images text, video, songs and sound clips allowing them to explore the concept or big idea of a unit or lesson.

Thinglink has a limited free version for educators (and various paid levels). The free version comes with enough features to allow you to create engaging interactive posters, maps or other artifacts and you can even create a class account for up to 100 students. You can link to and embed YouTube content, upload images and sound and add text blocks or titles. You can even embed 360° Videos and create interactive 360° images with embedded ‘hot spots’.


Thinglink is a tool that fits various subjects and different grades. As a teacher, you can use ThingLink to provide interactive professional learning experiences and present information to your students. It can also be used as an Augmented Reality tool in a field trips as well: you can work on a ThingLink map, and add multimedia information to different spots on the map. When students come to a certain place, they can click on the accordingly place on the map and be directed to the information you have prepared for them (such as Youtube videos, audio, images, or webpages!)

With a free teacher account, you can create a class group of (up to 100) students and do not need student personal information (emails or full names) in order to add students. Given that Thinglink is not Canadian housed, I would recommend avatar names or initials and also be sure to educate your students about privacy protection. To create multiple classes, you need a paid account.

In a Social Studies classroom, for example, students might use an historical image and add features (video, hyperlinks, text, sound) to the image in order to tell a story about a particular event or period in time. Hover your mouse of the example below to see images from the past and present integrated to tell ‘my’ story. Teachers might create a video of their own story to share with their students as inspiration for discussion or student-created stories.


1. Sign up: select the free education version and sign up with your email address. (You can always upgrade to pro after you try it, if you think you’ll use it and/or if you want to use it with your students)

2. Start: Click on the “Create” tab to start making your own interactive images and videos.

3. Tagging your image:

  • Click anywhere on the image to add your first tag
  • Click on the icon image to select an icon

4. Sharing Your Videos and Images

  • Open up the image or video and select the “Share” button
  • Either click on an icon for one of the linked platforms or copy and paste the URL or embed code
  • Sharing your image

For more detailed tutorials, go to ThingLink Standard Features Tutorial.

ThingLink in 3 Minutes or Less – highlights uses of the app:


Leave a Comment

Filed under AR & VR, Not Subject Specific, Resources

iMotion

whatisit.png

iMotion is an intuitive and powerful app that allows you to easily make your own movie by taking photos with your iPhone or iPad. Using iMotion, you can make time-lapse animations (taking pictures of multiple frames and showing their progress such as clouds moving in the sky and plants growing) or stop-motion animation (taking pictures of frames in which the item of focus is moved between frames such as puppet animation and cartoons).

iMotion is free to download and offers various features:

-Quick and smooth interface
-Autosave and direct preview
-Reverse playback
-Unlimited movie length
-Retina Display
-4 capture modes (time-lapse, manual, wifi remote, microphone)
-Ultra speed shooting up to 10fps
-Variable frame rate playback
-Portrait and landscape orientations supported
-Useful capture tools (Manual Focus, Exposure & White balance, Onion skin…)
-Export: videos, photos and animated GIF to your Photo Library, iTunes Sharing Folder, Facebook, Youtube, Mail and iOS apps.

In-app purchase is required to unlock some additional features.


Why-is-it-relevant-360x82.png

iMotion is an app that facilitates the process of creating time-lapse and stop motion animations with various objects in your classroom.  It is a great way to engage your students and give them hands on opportunities with their own creations, technology and multimedia. In addition, it can open the door to storytelling.
Thanks to iMotion, students can be given a theme and be asked to create their own narratives or stories in the form of a storyboard allowing them to visually reflect on the sequence of the story and how it will be displayed (similar to aspects of mind-mapping). In addition, with the iMotion app students are then allowed to capture and present their work to one another in a fun way.

how-to-get-started-360x80.png

After downloading the iMotion app from Itunes on your iPad/iPhone, follow these steps to get started:
  1. Give your students a theme or idea.
  2. Guide your students through the storyboarding process.
  3. Create the background for their story and organise any props.
  4. Open iMotion HD and select NEW MOVIE
    1. To create a time lapse video select TIME-LAPSE, adjust the interval speed and give your video a name
    2. To create a stop motion video select MANUAL and give your video a name.
  5. Click START.
  6. Adjust your iPad/iPhone so that your background is within the camera frame.
  7. Select CAPTURE to take a photo.
  8. Continue capturing photos to create your animation.
  9. When all your frames are complete, click STOP.
  10. Click STOP again to confirm that you are done.
  11. You are then given the opportunity to adjust the frame rate of your animation.
  12. Click EXPORT to send your completed animation to the photo library.
  13. Go to the photo library on the iPad/iPhone, select the movie and share it via email/Facebook/Youtube.

videopng-360x61.png

Leave a Comment

Filed under Not Subject Specific, Resources

Just Moodling around

stockvault-students113094

whatisit.png

I was recently asked about Moodle and how to go about using it… I’m definitely not an expert in this Learning Management System but I have enjoyed messing about with it to create a course or two during my own Masters Program.

What is Moodle?  “Moodle is a Course Management System (CMS), also known as a Learning Management System (LMS) or a Virtual Learning Environment (VLE). It is a Free web application that educators can use to create effective online learning sites.” from https://moodle.org/

I’ve never personally come across Moodle courses in an elementary school setting. It is, however, commonly used at the secondary and post-secondary level to create online course material. Other LMS’s include: Blackboard, Desire2Learn, Joomla


Why-is-it-relevant-360x82.png

Moodle has a simple interface, with drag-and-drop features, and is highly customizable. It is also free and open source, meaning that anyone with programming skills can adapt Moodle to the particular needs of a school or course.


how-to-get-started-360x80.png

Visit Moodle’s website and try out their online Sandbox – you can practice building a course using the login information provided… note that login times out after about an hour and your work is not saved. You can also take a tour of their ‘demo site’ at the fictitious Mount Orange School. At this fictitious school site, you’re even able to login as a student, teacher, parent or manager to test out features. Take a ‘video tour’ of Moodle and learn more.

Finally, there are many blogs out there where you can learn Moodle tips and tricks (including, of course, the Moodle forums which I’d recommend you join!). Visit Michael Penney’s blog for some very clear and concise tutorials.


videopng-360x61.png

Leave a Comment

Filed under Resources

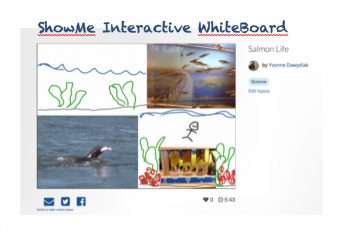
ShowMe Interactive Whiteboard

ShowMe Interactive whiteboard app is a mobile application that allows teachers and students of any age to create presentations called ShowMe’s that can be shared via the device or online privately or to a community audience. The user can record and create engaging voice over presentations of their chosen topic by using some of the many tools such as adding text, drawings, photos and images.

You can also access teacher and student created ‘ShowMe’ content covering a vast selection of academic subject matter as well as non academic topics on their website and you can subscribe to a premium service that provides a number of extra features such as private postings options, advanced tools, more storage and specified group sharing. The ShowMe interactive whiteboard app is a tool with great potential for both teaching and learning.

FEATURES

– Voice-record
– Multiple brush colors
– Enter text
– Pause and erase
– Import pictures from your photo library, built-in camera, or web image search
– Import documents as pictures from dropbox, or google drive
– Create video from any document
– Unlimited lesson length
– Free to upload and share your recordings with friends
– Easy embedding for sharing anywhere
– Manage students with Groups

As flipped classrooms become more popular, teachers are interested in creating their own tutorial videos for their students. ShowMe is a straightforward tool that would help you create attractive screen casts. Other applications to try for this purpose include: Camtasia, VideoScribe, Explain Everything or Shadow Puppet.

Given it’s relatively straightforward user interface, ShowMe makes an excellent formative assessment tool for teachers. Students can be encouraged to “ShowMe” what you know about a particular concept or topic. The app will allow them to share photos, drawing, video and audio – showing and telling the story of their learning in a way some children are unable to do effectively on pencil and paper.

Recently, ShowMe has also come out with a ‘Markup App’ that allows teachers to annotate student work on their ipads.

Leave a Comment

Filed under Assistive Technology, Not Subject Specific, Resources