Tag Archives: multimedia

Les droits d’auteur

What is it
La législation sur les droits d’auteur existe pour assurer aux créateurs de contenu original de recevoir des compensations (monétaire ou non) pour leur travail et aussi pour que le public général ait accès à ces ressources et créations.  Les auteurs ont le droit de reproduire, distribuer, représenter, et afficher leur travail. Comme pour tout autre objet physique, que ce soit une voiture, une maison, etc. le propriétaire doit donner son accord pour que quelqu’un s’en serve.  La violation des lois sur les droits d’auteur entraîne des mesures juridiques.

Why is it relevant

Il faut comprendre les droits d’auteurs avant de télécharger et de publier des contenus sur un site Internet.  Si les idées ne sont pas protégées par la loi sur les droits d’auteur, le support sur lequel elle est exprimée, l’est, que ce soit un texte, une image, de la musique, une vidéo, etc.  Alors, avant d’utiliser un contenu trouvé sur internet pour des présentations ou des leçons, bien vérifier bien qu’on peut le faire. En cas de doute, il vaut mieux trouver une autre source.  Pour plus d’information ou pour poser des questions spécifiques visiter : copyright.ubc.ca ou passer nous voir.  Nous avons des ateliers et des séances d’information.  



How to get started

En règle général : utiliser Creative Commons ou les images du domaine public.  Quand on cherche des images en ligne, préciser ses besoins en utilisant Creative Commons Image Search.  Si le besoin n’est pas pour ‘raison commerciale’ décocher l’option et comme ça les choix d’images augmenteront considérablement.  En utilisant le Creative Commons, on peut en même temps consulter des sources populaires, par exemple : Google images, Flickr, Wikimédia commons et YouTube.

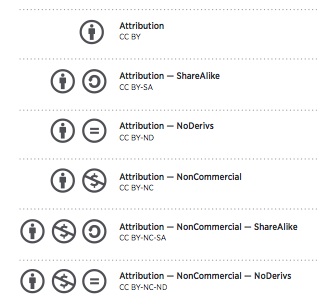
Il faut noter que cette recherche est filtrée et que les résultats ne montreront que les images avec le CC licence – cela veut dire que c’est à chacun de vérifier que le contenu n’a pas d’autres restrictions.  Ces restrictions et ces obligations sont généralement clairement indiquées sur la page du site de l’image. Si la page indique que le contenu est sous la CC licence quant à l’ attribution, vous n’avez qu’à référencer l’auteur du travail.  Souvent il y a des instructions sur le site qui indique comment faire.  En général, que ce soit demandé ou non, il est préférable de référencer les auteurs.

Pour une démonstration, regarder la vidéo ci-dessous:


Video demonstration
Many thanks to Common Sense Media for allowing us to translate their original video!

Leave a Comment

Filed under Blog Posts, en francais, Open Educational Resources, Resources

Les ressources éducatives libres (REL)

What is it
Les ressources éducatives libres (REL) sont “un outil pour enseigner, apprendre, et faire des recherches, elles sont dans le domaine public ou ont été publiées aux termes d’une licence de la propriété intellectuelle qui permet leur libre utilisation ou réorientation par des tiers.

Les ressources éducatives libres comprennent des cours complets, du matériel pédagogique, des modules, des manuels scolaires, des diffusions de vidéos, des examens, des programmes informatiques et d’autres outils et matériels, ou techniques utilisés pour favoriser l’accès au savoir” (Hewitt Foundation).

Les ressources éducatives libres fournissent aux utilisateurs une autorisation gratuite et non restrictive pour : Retenir, Réemployer, Réviser, Remixer, et Redistribuer.


Why is it relevant

Plutôt que de réinventer la roue, c’est beaucoup plus efficace de trouver du matériel avec un contenu de connaissances collectives déjà existant, de le modifier et de l’exploiter selon les besoins d’une classe.  On peut trouver des ressources sur beaucoup de sujets et de situations pédagogiques dans les archives REL, Pinterest, Twitter, et autres sites sociaux.  C’est important de comprendre les octrois de permis quand on utilise, mixe, et partage REL.  En outre, cet acte de collaboration professionnelle de partager ses propres ressources (originales ou modifiées) dans les archives REL est non seulement utile mais apprécié !

Dans REL, on peut trouver  : des manuels scolaires libres de droits d’auteur, des plans de leçons, des examens, des vidéos tutorielles, des présentations PowerPoint, etc. pour l’usage de sa classe. Il est recommandé d’ajouter à la banque de données de la connaissance collective ses propres REL !


How to get started

Tout d’abord, il est important de choisir et d’évaluer les bonnes ressources. Pour obtenir des ressources de grande qualité UBC Library, recommande d’aller sur son site libguide.  Si on veut partager ses propres ressources avec d’autres enseignants, il faut trouver l’archive éducative qui convient.  Pour commencer, voilà quelques archives REL :

Il y a aussi des manuels pédagogiques qui sont libres de droits d’auteur  et qui peuvent être trouvés sur le site BC ! (Open School BC et BCcampus: OpenED)

Pour  aider à créer des ressources et pour les partager, voilà des fiches d’exercices de l’atelier de EPSE 317 (Education Psychology and Special Education) July 2017 !

Selecting an OER Repository

ReadyforOpenSharingAssessYourLessonPlan

Choose A License – Creative Commons

Les diapositives pour l’atelier se trouvent ci-dessous :

Les ressources éducatives libres – Les diapositives

Suivre les consignes Open Education Repository Rubric pour évaluer les ressources.  Pour en savoir plus sur la pédagogie ouverte, visiter le guide de recherche à la bibliothèque de UBC sur REL  en appuyant ici !

En cas de questions supplémentaires sur : comment créer, télécharger, ou pour accéder aux archives REL ? Poser sa question ici !   


Video demonstration

Leave a Comment

Filed under Blog Posts, en francais, Not Subject Specific, Open Educational Resources, Resources

AR Flashcards: A new way to engage your students


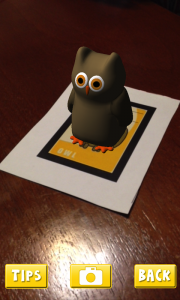
AR Flashcard – Animal Alphabet

AR Flashcards are a series of Augmented Reality apps used to teach your students words and concepts based on different categories such as animals, shapes, colors and planets. By using 3D animation, AR Flashcards bring print outs of animals and planets to life.

Some main features include:

  • colorful renditions of animals, dinosaurs and the solar system
  • sound effects
  • screenshot button which allows you to save your pictures

Click here for more information…


AR Flashcards are great tools for early childhood educators and English as an additional language (EAL) instructors. AR Flashcards create an entertaining way to introduce different vocabulary words to young children. According to testimonials, students have engaged with the app and have enjoyed the learning process:

“It’s definitely unique and a very clever way to get children involved in learning the alphabet and animal names.”

“Love how the animals pop up! My son gets a huge smile on his face when the animals appear. The new graphics are great and being able to take pics is cool.” (Augmented Reality Flashcards).


  1. Download and print out the cards from here . (Tip: print out flashcards in color and use cardstock paper)
  2. Download and install AR Flashcards to your mobile devices (the Alphabet and color have free versions where as the rest are paid apps) .
  3. Double tap the screen to bring up the focus button onto the flashcard so that you can adjust your device’s camera to bring the cards to life.

videopng-360x61.png

Leave a Comment

Filed under AR & VR, Math, Not Subject Specific, Resources

Prezi Presentation Tips: Dos and Don’ts

Untitgfgfled


by leonor brilha

whatisit.png

Prezi is a visually based presentation software that supports a non-linear storytelling approach to presentations. With many affordances, including the ability for the audience or presenter to zoom in and zoom out of the screen, Prezis can be powerful but they can also be problematic.

You may have used or seen a Prezi presentation. In case you’re not sure, Prezi is a presentation tool, that instead of following a linear format (slide after slide), it uses zoom and pan to connect the frames, changing not only the dynamics of a presentation, but also changing the way the audience makes connections between the ideas presented. Or at least, that’s what’s supposed to be the main advantage of using Prezi over other tools. However, as you may have seen, the zooms and pans are used by presenters only as fancy transitions between frames, with a lot of us in the audience left wondering, “What’s the point in all of this? All of this coming in and out of the screen, it’s so confusing. Should’ve just stuck to the good old slides.”

Below are some tips to support creating effective Prezi Presentation.


Why-is-it-relevant-360x82.png

What many presenters don’t realize is that, when choosing one presentation tool over another one, you have to make the most of what it has to offer. Prezi’s strength is in its non-linearity, but that doesn’t mean that the frames should be displayed randomly on the screen. The non-linear flow allows for seemingly unrelated concepts to come together by making new meaningful connections between them. Meaning through visual metaphors can be created by significant (hierarchical for example) spatial positioning on the screen and differentiation or similarity of concepts can be achieved by exploring design elements (colors and shapes). The biggest lesson is to use less text and bullet points, and let the visuals and transitions tie in the concepts of your presentation.


how-to-get-started-360x80.png

Before starting work on Prezi:

  • Think about what are the main goals of the presentation and what’s a good visual metaphor to represent it. This will be your main layout, which can be a path, map, tree, etc.
  • Also take into consideration what kinds of connections are there between your ideas and design the frames in relation to the layout. Where on the layout does it make the most sense to place each frame? How does it connect with the frame immediately before and after it, and how does it connect in general with the other frames?
  • Think about your presentation with a view of the whole in your mind, because at many times the audience will be able to see all the frames, and you want to draw the eye towards focus points.
  • Think about what visual/temporal patterns you’re creating with your presentation and how that’s going to influence the pattern of thoughts and learning process in the audience.

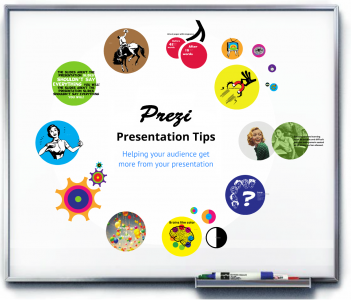
For a visual summary of these ideas and more tips for Prezi (made with Prezi!), please refer to this Prezi and video below it that walks through it.


videopng-360x61.png

Leave a Comment

Filed under multimedia creation, Not Subject Specific, Resources

Piktochart – for creating attractive infographics

whatisit.png

There are many applications you might use to  create informative and attractive online posters, otherwise known as infographics (including PPT, word, pages or any desktop publishing or word processing application). One of these, Piktochart, is a web-based and iOS application allows its users to create their own original design or select from a variety of well-designed templates. Those familiar with software like Microsoft PowerPoint should have little to no trouble using Piktochart as its simple and attractive design makes creating infographics rather intuitive for your average user. Another option I’ve used with students is Canva. NOTE: both Piktochart and Canva are not Canadian housed. Visit this post to learn more about protecting student privacy.

Free Version

  • Create:
    • Infographics
    • Presentations (similar to PowerPoint)
    • Posters
    • Reports
  • Copyright Free Access to:
    • Backgrounds
    • Icons & Images
    • Some Templates
    • PNG or JPEG Exports

An example of what a Piktochart Infographic might look like:

how-to-create-great-presentations


Why-is-it-relevant-360x82.png

Creating an infographic allows you to share your ideas in an attractive poster-style manner on the web via social media or embedded in a blog. Key ideas are highlighted without cluttering your information, which can often be unattractive and overwhelming to viewers. Being able to create and consume information in a visual way supports varied learners and allows even those with less developed fine motor skills create posters with a professional feel.

This application is designed in a way that encourages its users to keep their content simple and attractive, and makes it rather easy to do so. The Piktochart Blog also has an interesting post titled “Seeing is Believing: 5 Studies about Visual Information Processing” that outlines some key findings about the way people perceive digital media and its impact on digital content creation.


how-to-get-started-360x80.png

  1. Go to the Piktochart website and click “Start for Free” on the front page.
  2. Enter your information, and confirm your email address.
  3. Log in to Piktochart with your newly created account and get creating.


videopng-360x61.png

Basic features:

Watch the video below for a more in-depth tutorial:

2 Comments

Filed under Not Subject Specific, Resources

Haiku Deck

D


“The Wanderer’s Eye Photography”

whatisit.png

Haiku Deck is a presentation tool that simplifies the task of preparing a slideshow. It comes in two flavors: mobile app and web version, both of which create slideshows that can be viewed instantly on screen, or shared with a link. Like most presentation creators out there, it allows the user to add text, images, graphs, and public or private annotations. Here’s a comparison of the free and paid versions

[column size=3]

Free version:

  • Limited to 3 decks
  • Decks must be public
  • Themes
  • Uploading own images

[/column][column size=3]

Paid version:

  • Unlimited decks
  • Downloadable decks
  • Video
  • Private Decks

[/column]


Why-is-it-relevant-360x82.png

The great thing about Haiku Deck is its simplicity and how intuitive it is. Users can just click on anything to figure out what to add to the slideshow. Furthermore, with its embedded image search capability (Haiku Deck even suggests a few keywords pulled from your text to use!), users can easily add Creative Commons licensed images into the presentation, without having to worry about copyright issues. The attribution is added to the presentation automatically. Graphs can also be created in-app with all the necessary labels and values. In summary, it allows the presenter to focus on creating the content, rather than spending valuable time with preparing visuals.


how-to-get-started-360x80.png

Check out this example made with the web version, then watch the video below for a walk through:

Haiku deck – Created with Haiku Deck, presentation software that inspires


videopng-360x61.png

Leave a Comment

Filed under Not Subject Specific, Resources

VideoScribe

children-593313_1920

whatisit.png

VideoScribe is proprietary software (*FREE for UBC students and staff via Canvas) available for OSX, Windows, and IOs users for quickly producing high quality engaging videos, no experience or skill required. It comes with a large library of images, and adding and customizing your own content is easy and intuitive. Drop in audio, images, and video and customize their look and feel in addition to their display and animation time with the simple and powerful editor. What’s more, the app will automatically animate images and text you add to your project. When a project is complete it can be published to YouTube or Facebook, exported to PowerPoint, or saved locally.

Features

  • Royalty-free images
  • Automatic image and text animation
  • Download to multiple computers with a single license
  • Works offline
  • Save your Scribes in MOV, WMV, or AVI format
  • *At time of writing (Summer 2017), UBC licensing allows for a one year download that can be renewed by current staff, faculty and students. Update & Download instructions TBA (Sept 2022)

Why-is-it-relevant-360x82.png

Creating engaging content is an important part of presentation. As a digital technology for multimedia creation VideoScribe cuts down on production time and has the potential to significantly increase video quality, requiring little expertise on the part of its users.

This resource is great to use in a second language classroom such as French Immersion, Core French, etc.  It allows for students to creatively engage in language learning.

A students’ perspective including some tips and an example video are available on this blog post on the LT Hub. (Note: download instructions are dated and no longer apply)


how-to-get-started-360x80.png

VideoScribe is proprietary software. You will first need to download a free trial OR if you are a UBC student, staff or faculty member, you can download it via Canvas (or via the Teacher & Learning tab on the LT Hub)

    1. Log in to Canvas
    2. Navigate to the “Help” tab in the left hand navigation menu (question mark icon)
    3. Select “Software Distribution”
    4. Select “VideoScribe”
    5. Select “Contact the LT Hub” – at this point, UBC Learning Technologies Hub will verify your eligibility and provide support for you to access and download a license.


videopng-360x61.png

Check out this video tutorial that will guide you through creating with VideoScribe:

An example of a what you can do with VideoScribe:

A short animation created in about 10 minutes

Leave a Comment

Filed under Not Subject Specific, Resources