Tag Archives: app

Anatomy 4D : using AR to teach human body structure

PLEASE NOTE: Anatomy 4D is no longer available, but you may still be able to use the app if you downloaded it prior to May 2018. You can explore the other AR/VR technologies in our collection of resources to see newer alternatives to Anatomy 4D.

whatisit.png

Anatomy 4D is an iOS and Android-based, Augmented Reality app to help your students explore the human body and human heart structure with the cutting edge technology. It can help you simplify the complex concepts and help your students better understand the content!


Why-is-it-relevant-360x82.png

Based on instructors’ testimonials, Anatomy 4D has developed an interactive and amazing tool to engage students with important biology concepts allowing them to learn and explore the human anatomy. In fact, the 4D images and resources available on Anatomy 4D allow users to delve into the body through augmented reality and is currently used by students, teachers and medical professionals.

“Anatomy 4D is a fantastic app. It helps to understand human body structure to great extent to a layman like me.”( Purushottam Kunte)


how-to-get-started-360x80.png

  1. Download and print out the the posters (card stock paper is recommended).
  2. Note: posters must be colored.
  3. Download the Anatomy 4D app from iTunes or Google Play.
  4. Open the app and use your camera to scan the colored poster; use the filters to change what has been presented in front of you!

videopng-360x61.png

Have a quick look at how Anatomy 4D works:
Heart Target:

Body Target:

2 Comments

Filed under AR & VR, Resources

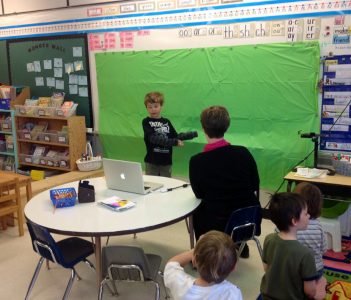
Green Screen for Storytelling


2016-10-06_10-50-33


Creative Commons licensed image courtesy of Kathy Cassidy (flickr)

whatisit.png

Create your own narrative using green screen technologies. Using a Green Screen (sheet of fabric or paper or even a chalkboard) and a video editing application, you can filter out the background of any image or video so that you can overlay your central image on any background – real or imagined!

Green Screen by Do Ink is a paid app available for use on iPads and iPhones. It is relatively inexpensive and has a simple and friendly interface that allows one to create green screen videos and photos effortlessly and in a matter of minutes. Features include:

  • Live recording and media upload
  • Combine up to 3 media sources
  • Scrollable timeline
  • Basic video editing
  • Color picker tool
  • Crop and mask tools
  • Saving and exporting

While the Do Ink app makes it fairly straightforward to utilize the green screen effect, there are other ways to achieve it:

  • Camtasia is a more powerful video editing and screen capture software that is available to UBC students, faculty and staff as a free download through UBC IT. One of the many functions of Camtasia is that you can filter out a chroma key color and make a green screen video or image. In effect, erasing the existing background and adding your own.
  • Many other video editing softwares will allow you to filter chroma key colour.
  • There are several free and paid iOS and Android apps on the market but, so far, I haven’t found one I like more than the Do Ink version.

Why-is-it-relevant-360x82.png

Green screen technologies can be incorporated into the classroom in all kinds of ways, the possibilities are endless and include student weather forecasts, time travel and fictional character interviews! Teachers can create media to engage students in a topic, showcase examples and record video lectures or tutorials. An astronomy teacher might be virtually transported into space as they give a ‘tour’ of the stars to their students. Green screen technologies allow you to transport to any place in the world or any time period! Especially now when students and teachers are spending so much time online, green screen technologies offer exciting varieties to one’s video background and are very effective for storytelling. Students can do video blogging, shoot their own movie with special effects or do a video presentation that appears to be taking place in any number of unique settings. For more inspiration on how to use green screen click here.

how-to-get-started-360x80.png

Green Screen Instructions

 1. Download Green Screen by Do Ink from the App Store and open it on your device.
image1
2. Click on “+” sign in the top right corner to create a new project.
image-003
3. Select a source for your project:
      – You could use the camera on your device to capture a picture or video or;
      – Upload existing media
Tip: If the object or person is in front of a plain background, the program can automatically filter it out (green and blue work best).
4. Select the rainbow wheel and turn on “Chroma Enabled”.
5. Select the colour of your background from the wheel and regulate the sensitivity to filter out the background.
Tip: If your background is not all of the same colour, try editing manually for best results:
      – Click on the mask symbol and then the eraser symbol and erase parts that are not automatically filtered.
 image-009
6. When you are done filtering out the background, under the current image or video select a source for the new background.
7. You can then drag and adjust the position and size of your sources by first selecting them from the timeline.
8. When you are ready you can choose if you want your media to display as a video or an image then select save.
image-00f
9. You can choose how you would like to export your media.
image-011
Now start creating and have fun! For more detailed use of the app, check out the Do Ink website.

videopng-360x61.png

Green Screen Videos Bring Content to Life

Green Screen by DoInk App Enables Creation ot Green Screen Effects on iPad & iPhone

Leave a Comment

Filed under AR & VR, multimedia creation, Not Subject Specific, Resources

FreshGrade

whatisit.png

FreshGrade is a Canadian-based e-portfolio based assessment platform, where teachers can easily document student activities, individually or in groups, assess and comment on their progress, and share with parents. The platform affords a ‘conversation’ among teacher, student and parents as a triad involved in the assessment and evaluation process. Using photos and videos to capture students’ activities in class, it offers parents a window into school activities and snapshots of student learning. Teachers are able to monitor and be reminded of daily student progress, and students are able to engage in self-assessment.


Basic Portfolio Platform

  • FREE Web, iOS & Android Apps for teacher, parent & students (Some BC School districts have licenses and automatically provision student accounts)
  • Unlimited documentation of learning via photos, video, audio & notes
  • Unlimited students and classes per teacher
  • Unlimited collaborators per class
  • Compatible with Google Drive, YouTube, iMovie, Explain Everything, and more
  • Organize the portfolio using filters and labels
  • Send announcements
  • Activity feed / notifications

Assessment Tools

  • Access Gradebook
  • Generate report cards
  • Track student progress towards skills/standards

Data Continuity

  • Portfolios follow students from grade to grade


Why-is-it-relevant-360x82.png

FreshGrade connects students, parents, and teachers around the highlights of a school day, in a similar way that social media connects friends and families around the world by sharing their activities.

As a teacher, you can use FreshGrade to provided some immediate feedback to your students’ work and easily track their personal growth. You can also record your own teaching portfolio using FreshGrade.

In addition, it can act as an efficient tool to encourage your students to engage in your class and choose what they want to present to their teachers and parents. With the Parents version, parents can be more involved in students’ learning process and give them immediate encouragement and feedback as well.


how-to-get-started-360x80.png

For teachers, FreshGrade is a straightforward tool that you can learn in a few steps:
1. First, sign up for a free teacher account download the app from your mobile device.
2. Then, use your mobile or web app to add a new class.
3. Add learning evidence to your student portfolios.
4. Share a highlight to the parents via email.

 Visit this getting started guide for more info!


videopng-360x61.png

A brief introduction:

Teacher Reflection:

Leave a Comment

Filed under Not Subject Specific, Resources

Padlet – cloud-based collaboration

UPDATE: As of April 2018, Padlet has changed to a paid subscription model. Free access is now limited to 3 boards. Once you’ve deleted a board, you can create additional boards.

For those interested in exploring Open Educational options, you may wish to try a suite of apps from apps.opened.ca hosted in the ‘Sandstorm’ ecosystem (a Canadian housed space) – you can even host the apps on your own server. Scrumblr and Brainstorm are the closest I’ve found to Padlet. You might also be interested in Etherpad (like a google doc but FIPPA compliant!). For more information, please visit ‘Open ETech: Free Range Ed Tech’.

Visit this blog post for a description of digital whiteboards and a few alternative applications including: Jamboard


What is it?

Padlet is an online wall to which anyone with the link can easily add text, audio, video, images, hyperlinks and even make simple sketches! There are templates available including a gps located map.
Users can share their ideas from any device with internet access whether they’re inside or outside the classroom. These virtual sticky notes can then help keep track of and enrich classroom discussions or help when designing a project. Students are even able to comment or react to the posts of others (depending on how the teacher/moderator configures the settings).

Why is it Relevant?

A collaborative whiteboard or posting board is a great way to share information and collaboratively create content. Consider a classroom brainstorm that often entails students raising their hands and sharing, one at a time, while the teacher or another student records on the board… now think about the possibilities if groups of students or pairs of students have a shared Padlet wall open and are all adding and sharing ideas and resources in real time! Once the brainstorming has taken place, the teacher can follow up with a group discussion that might involve evaluating, sorting and classifying responses… something that can be difficult to make time for when the act of brainstorming and recording is lengthy.

Using the Mapping template, students might collaboratively create a geo-located map for place based learning activities, response to a novel that involves a journey, sharing information about cultures and places around the world, etc.

Embedding media like videos and images is simple, and Padlet even allows users to record videos or take pictures in real time and places them directly into their documents. Create and share mind-maps, plans, diagrams, portfolios, maps and more. Remember to always consider privacy and copyright permissions when sharing images, video or other content online.

Another valuable affordance of Padlet for teachers is that you can ‘moderate’ your posts using the privacy settings so that you view anything a student posts and approve it before it becomes ‘live’.

Important features and considerations:

  • Accountability: MODERATE your wall using the MODIFY menu (the ‘settings wheel’ in Top right corner) to help provide some accountability for students (‘Modify’ –> Require Approval). In a f2f classroom, the T can also circulate while students work and approve posts (using a mobile device) as T circulates, interacts/prompts/probes. You can also ask students to self-identify using initials or you can have students work in small groups or partners.
  • Privacy: Using the SHARE menu, you can adjust privacy. Consider: is the content sensitive at all? If so, there are also techniques like question boxes to support co-creating ideas/questions around more sensitive issues – the T can then preview the questions and discuss with the class the next day. Will students share their photos? names? what are the school/district norms and expectations or permissions needed? This is NOT a FIPPA compliant space so it is very important that students not be required to login and/or provide any personal or identifying info. (Metadata including things like location services in images provide data so it is important your students are aware of how to protect their own privacy)
  • Accessibility: You can create a custom URL using the ‘SETTINGS wheel’ (top right corner). This is also where you add a title and instructions/description. Consider: Do all of your students have devices? Will this be an individual or small group or partner? Are there visually impaired students? Other learning needs?

Getting Started

Visit https://padlet.com/ and click on “Create a padlet”. Then double-click anywhere to start writing, it is that simple! The URL can be shared with anyone. To explore some of the settings available, please refer to the video demonstration at the end of the post.

Padlet One Page Instructions

Padlet Tips & Tricks


Save

Leave a Comment

Filed under Not Subject Specific, Resources

Universe Sandbox

Universe Sandbox is a physics-based Virtual Reality (VR) platform that offers users access to various advanced simulations. Using this software, you will be able to explore what happens if two galaxies collide or an asteroid crashes into earth with great detail and accuracy and you have the option of viewing this on VR headsets.

EDUCATOR PRICE: $16.74 (Original price is $ 24.99)

FEATURES:

  • Climate simulation
  • Advanced collision simulation
  • Stellar evolution and supernovae
  • Terraforming
  • Light-warping black holes
  • Dark matter
  • Procedural surfaces and planets
  • Original soundtrack by Macoubre (available for purchase in the future)
  • VR support (currently only HTC Vive/SteamVR)

Universe Sandbox is an advanced simulator and a fascinating tool to use in your physics classes. For younger students (grades k- 7), it could be an engaging way to introduce the solar system and examine the effects of gravity. For older students (grade 8-12), Universe Sandbox could be used to explore more complicated issues such as the greenhouse phenomena and climate change.

Using Universe Sandbox, you and your students can create and destroy planets on an unimaginable scale whether on a large screen or through VR headsets.

  1. Sign up for a teacher gaming account here and wait for them to validate your account (you will receive a 33% discount).
  2. After the purchase, you can access Universe Sandbox and explore the possibilities in your physics classes!

Leave a Comment

Filed under AR & VR, Resources

Explain Everything: Collaborative Interactive Whiteboard App

Explain Everything is a “whiteboard style” presentation app you can use to create tutorials and presentations. It is also a powerful storytelling and learning tool that allows your students to work on the same project collaboratively. Using Explain Everything, you and your students can design, screen cast and create multimedia content with video, audio, imported or drawn images, text, etc.

Explain Everything is available for iOS, Chrome OS, Android, and Windows.

Paid app with some free trial features (varies depending on platform and license)

  • iOS, Chromebook, Android and Windows
  • Interactive screen-casting whiteboard
  • real-time collaboration
  • cloud content and link-based sharing

PS. Schools can get a special EDU plan by contacting the Explain Everything Team .


There are many whiteboard style apps available on the market, each with their own particular strengths and weaknesses. This class of app allows teachers to create fairly high-quality, attractive tutorials and present information in a visually and engaging way. These apps can also be used by students to create presentations, lessons, tutorials, and more. Another application in a similar class is ‘VideoScribe‘ – it is powerful, proprietary software that UBC students, staff and faculty have access to through our LMS – learning management system.

An excellent purpose for whiteboard apps is in a formative or summative assessment. Rather than focusing on polished content for publication, students can be encouraged to ‘explain everything’ about a particular topic or ‘showme’ what you know (perhaps using ShowMe – a free white board style app).

This resource is great to use in a second language classroom such as French Immersion, Core French, etc.  It allows for students to creatively engage in language learning.


Read our Explain Everything Quick Start & Task sheet, then print & share it with your students if it’s their first time!

You can also read Explain Everything’s Comprehensive Guide HERE.

It only takes a few steps and a little practice to start using Explain Everything:

  1. First, go to the Explain Everything to download the app. You can also download it from the app store on the specific device that you’re going to use (eg. iTunes for iPad, Google Play for Android tablets, etc. )
  2. Next, sign up with your e-mail address and select which version you’re going to purchase.
  3. Then, click on the “+” button at the right top corner to create a new project. There are templates you can begin with and modify to meet your needs or you can start from scratch.
  4. Now it’s time to draw your elements and work on your animations and voice-overs!
  5. Want to use Explain Everything in your classroom? Here is a handout  Explain Everything BrittneyMerryweather that you can have a look!

Here is a video tutorial that will explain the most-used features of Explain Everything and help you to get started:

Leave a Comment

Filed under Assistive Technology, Not Subject Specific, Resources

Answer Garden

AnswerGarden is an IOS  and web-based tool that can be used as a quick and convenient way to collect some brief feedback from a group of students. No teacher or student login is needed, though teachers can set up an admin password and can also ‘moderate’ responses so that only those approve ‘go live’. Among other features, responses can be embedded in a blog, shared via social networks and translated at the touch of a button through google translate (click the ‘export’ button to find this option).


As a teacher, you can use AnswerGarden in your classroom for several different purposes:

  1. Use it as a platform that your students (even the quiet ones) can collaborate and brainstorm together about a concept or a project.
  2. Use it to collect students’ feedback as a short survey.
  3. Organize a quick online quiz for your students.

From the resulted word cloud, the most representative answers will be presented with the largest font. In addition, you can also check the frequency of the individual answers by putting your mouse on the specific word.


  • First, you need to create an AnswerGarden by entering a topic on the Create New AnswerGarden-page. On this page, you can set up with your topic, choose your AnswerGarden Mode (Classroom), the length that you are expecting for the answer, etc. Remember, don’t use too complicated questions that cannot be answered with short answers.
  • Then, share your AnswerGarden using the provided embed code or post a direct link to your AnswerGarden on FaceBook, Twiter, etc.  or email it to your students
  • Next, your students can start to post their answers to your question, either by entering their own answers or by clicking on and submitting existing answers. These are then presented in your AnswerGarden in the form of a growing word cloud.
  • Finally, to save and print out your word cloud, you can simply download it as a png file, or export it to Wordle or Tagxedo. Click here to learn more about the details. In addition, you can generate the QR code and download it as well.

videopng-360x61.png

Leave a Comment

Filed under Not Subject Specific, Resources
