Tag Archives: Presentation

Creative Commons Search (CC Search) : les contenus qui peuvent être partagés, utilisés et mixés !

What is it

Le CC Search est une banque de données pour les contenus de Creative Commons qui peuvent être partagés, utilisés et mixés dans un but éducatif ou autre.  En utilisant le CC Search, on peut rechercher différents types de ressources. Par contre, il ne faut pas oublier de citer les références de ces ressources dont la plupart viennent de CC .  Certaines sources du domaine public n’ont pas besoin d’être référencées (mais le faire est toujours apprécié).

Garder en tête que ces ressources ont des licences indépendantes avec le Creative Commons.  On peut même demander des licences pour son propre travail en ligne. Pour en savoir plus sur ces licences, visiter le site: https://creativecommons.org/choose/

Savoir à l’avance comment utiliser les ressource CC peut aider dans sa recherche.  Dans le CC Search, on peut cocher et décocher les onglets << ressources you can modify or adapt>> et << use for commercial purposes>> selon les besoins et le contexte.  Ne pas oublier de référencer les auteurs à chaque fois que des ressources sont utilisées !

En plus du site CC Search, il y a d’autres endroits où on peut chercher des images de Creative Commons:


Why is it relevant

Pour les professeurs, ils vont vouloir trouver des ressources multimédia pour des diapositives, des feuillets d’information, le blog professionnel ou le site de leur classe.  Le montage de leurs propres photos ou vidéos peut être un défi. Le CC Search aide à rassembler les ressources qui peuvent être utilisées à loisir tout en ayant conscience des règles de mention des licences et des références aux  auteurs. Il faut TOUJOURS lire et apprendre avant d’utiliser.



How to get started

Pour commencer l’utilisation de “CC Search” (le site nouveau et amélioré): CC Search 

  • Ensuite choisir “Use for Commercial Purposes” (pas necessaire pour un usage éducatif) et/ou “modify, adapt or build on” (si on veut modifier l’image).
  • Sélectionnez une image que vous aimez - copier les informations d'attribution pour les utiliser dans votre travail
    

Pour une recherche plus avancée, utilisez la vieille recherche “old CC Search” Website.

  • Vérifier que la touche « Use for Commercial Purposes » est décochée si on l’utilise pour des raisons éducatives, et selon les besoins cocher/décocher la boite « modify, adapt or build on ».
  • Ensuite choisir la source du site qu’on va rechercher, indiquer les mots clés, et appuyer sur le bouton vert. 
    • Pour les images :
      • Pixabay – permet de partager immédiatement sur des réseaux sociaux comme Facebook et Twitter.  Ces images sont en grande demande et sont de haute qualité. Elles sont gratuites et n’ont pas besoin d’être référencées.  Le site permet aussi l’accès payant à un stock de photos de haute qualité.
      • Open ClipArt
      • Google Image
      • Flicker
      • Unsplash (communauté virtuelle de partage de photos)

      Pour la presse : Europeana, Wikimédia Commons, et SpinXpress

      Pour les vidéos et la musique : YouTube, ccMixter ou Soundcloud

  • Enfin, choisir la taille du fichier, le télécharger.  Ne pas oublier de lire les droits d’auteur et référencer les auteurs dont les travaux sont utilisés.
  • La vidéo ci-dessous montre comment faire.


Leave a Comment

Filed under Blog Posts, en francais, Not Subject Specific, Open Educational Resources, Resources

LLED 360: Meeting the needs of ALL learners

Integrating Digital Technologies in classroom practice is an ongoing ‘project’ or challenge for educators. As someone who has been teaching for over 25 years, I am still ‘on the road’ to mastery and enjoyed the opportunity to share examples and engage in critical dialogue with the teacher candidates in Christine Bridge’s LLED 360 Classroom Discourses and Teaching English Language Learners class. It’s always a pleasure collaborating with Christine to try to meet the needs of the varied learners our secondary teacher education classes!

Students in  LLED 360 are engaging in readings, discourse and interactivities relating to how secondary school students develop as first and second language learners in formal school environments across subject areas. In our session, Secondary Teacher Candidates were asked to consider Backward Design/UDL and effective technology integration models including  SAMR and TECH (a more student-centered model/approach) and were engaged in trying various digital technologies as we considered UDL and approaches to support the needs of ALL learners.

To get us thinking about meeting varied needs using multimodal approaches, TCs engaged in a padlet wall brainstorm where they co-created a list of resources by modality (Remember, when you use this app with your students, moderate your wall and change the access settings when done!)

Made with Padlet


Here is a PDF of the slides from our session: handout LLED360 Nov 2017-1   and links to the different applications and concepts applied:

AR/VR: A post from my blog (June 2017)

MindMup – concept mapping to build connections

Padlet – brainstorm, digital whiteboard/tack board

Plickers – student response system – cards and one mobile device needed (smartphone, ipad)

ShowMe – multimodal response, interactive whiteboard for iOS, android – narrate, annotate, draw, write, import images and share to cloud – “showme what you know about…”

Skype in the Classroom: engage your students by virtually inviting experts (and/or other students!) into your classroom.

UDL/Universal Design for Learning – on the Designing Learning Blog created by Claire Rushton and I to provide links to BC curric, planning info and some potential templates for use as lesson (unique learning experiences) and unit plans (big picture). Many of the templates were created by local school districts so may be of specific interest for planning for practicum and beyond!

In closing, we used an anonymous polling application that autocreates a wordcloud. Note that where an idea was generated more than once by unique individuals, it appears larger in the cloud!  Answer Garden  , like padlet, allows you to moderate and lock responses.


Leave a Comment

Filed under Blog Posts

HP Reveal – Augmented Reality Platform

IMG_0154


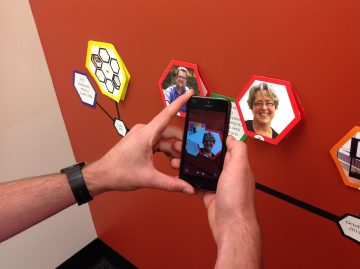
User scanning a trigger with the HP Reveal app

whatisit.png

HP Reveal (previously known as Aurasma) is an augmented reality platform accessible via the web, mobile app, or as a software developer’s kit (SDK).

Users upload “trigger” images and add overlays like images, video, 3D animations and sounds to them either through the web application or on their devices. Making your Auras public allows your followers to scan your trigger images in the real world in order to view your Auras.

Free Features:

  • Shared Auras (users must follow you to view)
  • Unshared Auras (which you can still share with specific user using links)
  • Social media sharing (with controllable sharing permissions)

Why-is-it-relevant-360x82.png

As virtual and augmented reality software and applications like Pokémon GO become more advanced and accessible to the average user, educators must ask themselves where they might benefit the educational community. The value in HP Reveal is that it brings static content to life, turning an observational learning environment into a more interactive one. There are already a number of ways teachers have incorporated this platform in their classrooms to boost student engagement and interactivity.


how-to-get-started-360x80.png

  1. Download the HP Reveal app from the Apple App Store or the Google Play Store depending on your device
  2. Sign up with your email, create a username and password
  3. Create your first Aura:
      1. Take a picture of an object to act as a trigger. HP Reveal works best with flatter triggers like pictures, posters, or patterns. The more detail in the image the better.
      2. Upload the image either from your device or through the web application.

    Screen Shot 2016-08-26 at 10.20.29 AM

    Screen Shot 2016-08-26 at 10.30.48 AM

  4. Add overlay content. When the trigger image is scanned the overlay content will be displayed. If you are creating the Aura on your device you are limited to the default overlays that come with the application. Creating Auras through the web application allows you to upload 3D animations, sounds, images, videos, and add actions to each to make them even more interactive.
  5. Screen Shot 2016-08-26 at 10.39.56 AM

videopng-360x61.png

Leave a Comment

Filed under AR & VR, Not Subject Specific, Resources

iMovie

iMovie is an IOS and MacOS based video-editing tool. With iMovie, you can choose and edit previously shot videos, add titles, music and effects in only a few steps. In addition, you can access your creations from any Mac device, and you can publish or share it on various social media platforms such as Facebook, Vimeo, and YouTube.

Features include:

  • various built-in music and sound effects
  • 10 creative video filters
  • voice-over recording
  • speed-changing effect
  • picture-in-picture effect
  • split-screen effect

With iMovie, you and your students can create engaging videos that can be shared with the class and that incorporate topics relevant to the lesson. iMovie allows you to use different effects and features to edit and add different elements to your video. For example, as an instructor you can add titles and record voice-overs that can be useful when trying to guide your students or provide additional information.

In addition, with iMovie’s effects, students can add a broadcast feel to their productions with picture-in-picture and split-screen effects. They can also place their characters “on location” in exotic places using green-screen effects. Last but not least, using the built-in filters, you and your students can easily make videos look more professional.

Click here for more detailed information about iMovie’s features.


  1. Download iMovie here or from the iTunes store on your iPhone/iPad. After downloading the app, choose to create a new project with your app.
  2. Name your video and set the aspect ratio. The widescreen ratio (16:9) is recommended.
  3. Choose the theme you wish to use. Take the time to play with the theme before making your decision. Of course, you can always switch to a different theme while editing as long as you ensure the “Automatically Add Transitions and Slides” option is unchecked; otherwise, you will need to do some tedious work on manually setting up the timeline.
  4. In order to import your video, go to “File” in the menu bar, select “Import”, and click on “Movies…”. From here, you will choose the video files that you would like to import into iMovie.
  5. Now you need to select which clips you would like to add into your video. Once  your clips are loaded into the iMovie project database, select which clips you would like to add into your video. Click on each clip and drag it into the timeline. While adding your clips, make sure to put them in the right order.

Leave a Comment

Filed under multimedia creation, Not Subject Specific, Resources

Educreations: Interactive Whiteboard App

whatisit.png

Educreations is an interactive whiteboard that has an easy, interactive platform and is straightforward to use. It allows you and your students to do screenshots, record video/audio clips, embed websites/images and share what you have created with others immediately. Educreations is only available for iPads and web browsers, and basic features are free.
The features include:

  • Capture your ideas
  • Use your content
  • Share instantly
  • Cloud sync

Why-is-it-relevant-360x82.png

Educreations is a good tool to help you create a digital classroom or work with a flipped classroom model. On the one hand, it is straightforward to use, so you can focus on your content instead of spending time learning about the technologies. With it, you can easily save your drafted work on your iPad, and share it with your students and co-workers whenever you want. What’s more, all of its basic features are free.

On the other hand, Educreations can be used as a multimedia model to help your students with their learning and communication. Students can choose their own format to capture their ideas (video, audio recording, drawing, typing, inserting website or take a picture, etc.) and to communicate with others. They can also control their own pace while learning new content. Educreations is a platform that helps you to create an equal accessible environment for all your students.

Here is an example of what you can do with Educreations:

https://cdn1.educreations.com/static/examples/paul-groves-accuracy-and-precision.mp4


how-to-get-started-360x80.png

You can get started with Educreations in a few steps:

1. Download the app from your iTunes store on your iPad or to your laptop web browser.
2. Sign up as an educator (or student) and log in.
3. As shown in the screenshot, you can choose to click on the audio icon to record your lecture, use the pens/brushes to draw/mark on the screen, use the eraser to erase your typos, or click on the “+” icon to add websites’ URLs, videos, images, etc., to your screen.
4. Play to explore different features!


videopng-360x61.png

Leave a Comment

Filed under Assistive Technology, multimedia creation, Not Subject Specific, Physical and Health Education, Resources, Video & Video Tutorials

Prezi Presentation Tips: Dos and Don’ts

Untitgfgfled


by leonor brilha

whatisit.png

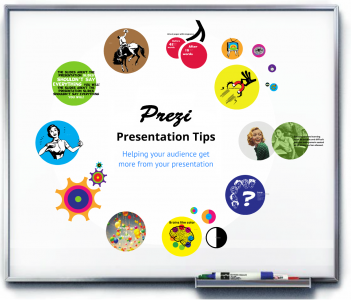
Prezi is a visually based presentation software that supports a non-linear storytelling approach to presentations. With many affordances, including the ability for the audience or presenter to zoom in and zoom out of the screen, Prezis can be powerful but they can also be problematic.

You may have used or seen a Prezi presentation. In case you’re not sure, Prezi is a presentation tool, that instead of following a linear format (slide after slide), it uses zoom and pan to connect the frames, changing not only the dynamics of a presentation, but also changing the way the audience makes connections between the ideas presented. Or at least, that’s what’s supposed to be the main advantage of using Prezi over other tools. However, as you may have seen, the zooms and pans are used by presenters only as fancy transitions between frames, with a lot of us in the audience left wondering, “What’s the point in all of this? All of this coming in and out of the screen, it’s so confusing. Should’ve just stuck to the good old slides.”

Below are some tips to support creating effective Prezi Presentation.


Why-is-it-relevant-360x82.png

What many presenters don’t realize is that, when choosing one presentation tool over another one, you have to make the most of what it has to offer. Prezi’s strength is in its non-linearity, but that doesn’t mean that the frames should be displayed randomly on the screen. The non-linear flow allows for seemingly unrelated concepts to come together by making new meaningful connections between them. Meaning through visual metaphors can be created by significant (hierarchical for example) spatial positioning on the screen and differentiation or similarity of concepts can be achieved by exploring design elements (colors and shapes). The biggest lesson is to use less text and bullet points, and let the visuals and transitions tie in the concepts of your presentation.


how-to-get-started-360x80.png

Before starting work on Prezi:

  • Think about what are the main goals of the presentation and what’s a good visual metaphor to represent it. This will be your main layout, which can be a path, map, tree, etc.
  • Also take into consideration what kinds of connections are there between your ideas and design the frames in relation to the layout. Where on the layout does it make the most sense to place each frame? How does it connect with the frame immediately before and after it, and how does it connect in general with the other frames?
  • Think about your presentation with a view of the whole in your mind, because at many times the audience will be able to see all the frames, and you want to draw the eye towards focus points.
  • Think about what visual/temporal patterns you’re creating with your presentation and how that’s going to influence the pattern of thoughts and learning process in the audience.

For a visual summary of these ideas and more tips for Prezi (made with Prezi!), please refer to this Prezi and video below it that walks through it.


videopng-360x61.png

Leave a Comment

Filed under multimedia creation, Not Subject Specific, Resources

Piktochart – for creating attractive infographics

whatisit.png

There are many applications you might use to  create informative and attractive online posters, otherwise known as infographics (including PPT, word, pages or any desktop publishing or word processing application). One of these, Piktochart, is a web-based and iOS application allows its users to create their own original design or select from a variety of well-designed templates. Those familiar with software like Microsoft PowerPoint should have little to no trouble using Piktochart as its simple and attractive design makes creating infographics rather intuitive for your average user. Another option I’ve used with students is Canva. NOTE: both Piktochart and Canva are not Canadian housed. Visit this post to learn more about protecting student privacy.

Free Version

  • Create:
    • Infographics
    • Presentations (similar to PowerPoint)
    • Posters
    • Reports
  • Copyright Free Access to:
    • Backgrounds
    • Icons & Images
    • Some Templates
    • PNG or JPEG Exports

An example of what a Piktochart Infographic might look like:

how-to-create-great-presentations


Why-is-it-relevant-360x82.png

Creating an infographic allows you to share your ideas in an attractive poster-style manner on the web via social media or embedded in a blog. Key ideas are highlighted without cluttering your information, which can often be unattractive and overwhelming to viewers. Being able to create and consume information in a visual way supports varied learners and allows even those with less developed fine motor skills create posters with a professional feel.

This application is designed in a way that encourages its users to keep their content simple and attractive, and makes it rather easy to do so. The Piktochart Blog also has an interesting post titled “Seeing is Believing: 5 Studies about Visual Information Processing” that outlines some key findings about the way people perceive digital media and its impact on digital content creation.


how-to-get-started-360x80.png

  1. Go to the Piktochart website and click “Start for Free” on the front page.
  2. Enter your information, and confirm your email address.
  3. Log in to Piktochart with your newly created account and get creating.


videopng-360x61.png

Basic features:

Watch the video below for a more in-depth tutorial:

2 Comments

Filed under Not Subject Specific, Resources